HOMETITLE Recipe Crafts Mommy Time Image Map

Saturday, September 6, 2014

Pizza Pasta


I think we have been on a pizza kick lately.  The other day I posted my Chicken Bacon Ranch Pizza and now I am posting this.  I don't think I see weight loss coming anytime soon!  That's ok... I'll just be fat and happy :p


My grandma brought me a recipe very similar to this for my father's birthday dinner.  I LOVED it!  I tweeked it and it was a huge success with my toddlers.

My girls are my worst critics.  They are picky and hardly ever eat anything except chicken nuggets, corn dogs, and mac and cheese.  I usually ask them "Is it good?" about five minutes into dinner and they don't ever have a problem telling me "NO".  I didn't hear any "NO's" on this dish.  Matter of fact, I didn't hear any talking at all!  They ate it all!  YIPPEE!


This pasta is incredibly easy to make unless you get fancy and decide to make your own pasta sauce. It takes 30 minutes to prepare....
30 minutes to bake.....
and 5 minutes to devour :)


Oh and by the way... This recipe makes ALOT!!  I made two 9x13's.  One we ate for dinner and the other I stuck in the freezer for a rainy day.  I love big recipes that surprise me and give me an extra meal.  


Pizza Pasta Recipe:

Ingredients:
2 lb hamburger
2 c sausage - I used Jimmy Dean
2 boxes of noodles - any shape or size.  You can even mix different ones together
1  minced green pepper 
1 minced onion 
1 container  fresh sliced mushrooms 
1 pack pepperoni
4 cups shredded mozzerella cheese
2 c parmesan cheese
1 large jar Prego pasta sauce
1 large can pizza sauce


Makes 2 9x13 dishes.

1)  Brown the sausage until done.  Drain and crumble.  Set aside.
     ( Do not cook with the hamburger.  I did this and it became too greasy.)

2)  Brown the hamburger in a large skillet with green pepper and onion.  Drain and add to a large pot.

3)  In the large pot with the hamburger, add the sausage, mushrooms, pepperoni, and both sauces.
      Cover and simmer for 10-15 minutes.  Stir occasionally.

4)  Meanwhile have your noodles boiling in a seperate pot.  Drain when done.

5)  In the 9x13 dish add noodles.  Layer the sauce mixture on top. Finish off with cheeses.  
     I layered mozzerella, then extra pepperonis and mushrooms, then a layer of parmesan.

6)  Put in the oven and bake for 30 minutes on 350.


The girls patiently waiting for it to come out of the oven :)  Sorry my child's hair was straight up from nap time lol.

Friday, August 29, 2014

In My Spare Time....

Recently I have been a little MIA from the blog lately.  It's not because I don't love you!  I promise I do! "I do..I do...I doooo-oooo" (in my nerdiest Orange Soda voice)

My life has been a little more than chaotic lately.  In the mix of raising two tiny, mischievious, most opinionated, and sassy little girls I needed a break. 

After about 5 year, I picked up a paint brush again and I started to paint.  Painting gives me such a fulfillment. Everything is quiet.  I make my own little bubble for me and my canvas and it is pure serenity. I call it "My mommy getaway."  Don't worry.  My getaway is exclusively after bedtime :)  *No child was harmed or neglected in the making of this art*

I thought I might would share some with you.  If you think they suck...please be nice and lie to me ;) 


I painted this Dumbo from the Disney Smiles Collection.  I did not create this piece.  All I did was recreate.
Angie from Big Bear's Wife LOVED it for her birthday!!


This was for Angie's sister in law, Meghan.  She loves owls, japanese cherry blossoms, and all things teal JUST LIKE ME!!!  She wanted this piece for her future kitchen!


Olaf.  Of course you already knew that!  Frozen and Olaf have been my most requested pieces.  Frozen has definitly taken over the world this past year!


Ariel from the Little Mermaid.  She was also a part of the Smile Collection I believe.  I simply wanted to paint her on my own for my own amusement.  Soon I am going to have enough Disney paintings on my own to have an entire "Disney Art Wall".


This abstract flower I found on google and thought it would be a perfect piece for my sister in law Ariel.  She hung it in her new apartment :)  I LOVE the bright colors with he dark contrast.


This I painted for one of my nephews.  I thought they were all Avengers....until I went to his party and saw all of the characters on the table cloth lol.  WOOPS!  He loved it anyways thank goodness.  Silly me!  I really need a boy so I can stay up to date on things other than Disney Princessses.


Strawberry Shortcake was a request from my friend Heather's little girl who looks just like Strawberry!


This was the biggest painting I had ever tried.  Too big to sit at my kitchen table, so I set up camp in my bedroom floor.  It was SOOO much fun and I really shocked myself. Those are the pieces I love the most. The ones where I am so positive I'll never be able to pull it off and I do.

My brother in law, Josh asked me to paint this picture of the dam in our city.  It is now hanging on the wall of his office for all of his clients to see!

Chicken Bacon Ranch Pizza


Pizza is pretty much everyone's favorite.  It's the "Im too lazy to cook" food.  It is the "WOO! Party time!
Let's have pizza!" food.  Pretty much whatever situation you have going on ... pizza is always the answer.


When I was dating my husband we ate a LOT of pizza.  Too much pizza probably.  We found out about the
Domino's online ordering and LOVED to order and play.  Something about watching your pizza process online is just so much fun!

Eventually we got bored of our "usual" pizza orders and decided to branch out.  We tried the chicken bacon ranch pizza.  I fell in love at first bite!


I wanted to try to recreate it at home so I knew at any moment I could make it myself.  It was a very close contest.  Matter of fact my husbands first words were "This is damn good!" (Sorry for the language ;) )


Chicken Bacon Ranch:
3 boxes Jiffy Pizza Dough (or your own pizza dough)
6 chicken tenders
8 slices bacon
3 tbsp grilling seasoning (I used "Butt Rub")
1 1/2 cup shredded mozzerella cheese
1 packet dry ranch seasoning
1 cup mayonnaise
1 tbsp olive oil

- Prepare the pizza dough as directed on box.
  Spread onto greased pizza pan or cookie sheet.
  Bake for 5 min on 350

-  Rinse of chicken tenders and sprinkle with seasoning.
    Heat skillet on medium heat with olive oil.
    Place tenders on skillet and cook on each side for about 6 minutes each or until done and tender.
    When done, cut into small chunks.

- Fry bacon in a seperate skillet.
  When done place on a paper towel and pat dry to get rid of most of the grease.
  Crumble into pieces and place in a bowl.  Set aside.

- In a small bowl mix ranch seasoning with mayonnaise.

-  On pizza crust, spread ranch mixture.  Top with chicken pieces, then bacon bits.  Sprinkle cheese on top       of the entire pizza.

- Bake in the oven on 350 for about 10 minutes or until cheese is melted ad golden brown in color.


Friday, July 11, 2014

Blackberry Dumplings


When I was a little girl I remember my mom going to pick blackberries.  She loved stopping on the side of the road just to pick them.  I never really got into it as much as she did.  However, this summer has been bringing back those memories.  I see blackberries and bushes everywhere I go it seems like.


Recently, I remembered my mom making blackberry dumplings with berries we had hand picked one evening. This memory made me crave them.  I couldn't find any bushes around my yard so I had to settle with ones already picked from the grocery store.  No worries!  They turned out DELICIOUS!!

I wasn't for sure how she made them before and she couldn't remember either so I made two different recipes!  Same ingredients... but one was in a skillet and turned out more soft and gooey and flavorful.  The other recipe I baked came out crispy and just as delicious.  I ended up eating two of each in a thirty minute period! That's how scrumptious they were!  For now, I am sharing both on this post and you can choose your favorite.


Blackberry Dumplings:  (For soft gooey dumplings cooked in syrup) (My favorite)

12 oz fresh blackberries
1/2 c sugar
1/4 c water
2 tbsp cinnamon
1 can crescent rolls
2 eggs
1 tbsp milk

1)  In a small bowl mixed 6 oz blackberries, sugar, water, and 1 tbsp cinnamon.  Mash the blackberries in          well.

2)  Heat the blackberry mixture in a small or medium sized skillet over medium heat.

3)  While waiting for the blackberry mixture to sizzle.... In another small bowl beat eggs and stir in 1 tbsp
      cinnamon and the milk.

4)  Roll out the crescent dough into their triangle shape.  Brush egg mixture onto the dough.  Place three
     blackberries in the center and roll the dough into a ball covering the berries.  Brush more of the egg    
     mixture on the outside of the ball.

5)  Once the blackberry mixture in the skillet has begun to bubble add the dough balls.  Cover and let sizzle
      for 10 minutes.  Flip the dumplings over and let sizzle another 5-10 minutes.

6)  Remove from heat.  Serve with vanilla bean ice cream or cool whip.


Blackberry Dumplings:  (For crispy baked dumplings)

12 oz fresh blackberries
1/2 c sugar
1/4 c water
2 tbsp cinnamon
1 can crescent rolls
2 eggs
1 tbsp milk

1)  In a small bowl mixed 6 oz blackberries, sugar, water, and 1 tbsp cinnamon.  Mash the blackberries in          well.

2)  Heat the blackberry mixture in a small or medium sized skillet over medium heat.

3)  While waiting for the blackberry mixture to sizzle.... In another small bowl beat eggs and stir in 1 tbsp
      cinnamon and the milk.

4)  Roll out the crescent dough into their triangle shape.  Brush egg mixture onto the dough.  Place three
     blackberries in the center and roll the dough into a ball covering the berries.  Brush more of the egg    
     mixture on the outside of the ball.

5)  Grease muffin pan ad add the balls into each muffin cup of pan.

6)  Bake at 375 for 15 minutes.

7) When done remove from oven and serve with the blackberry syrup and vanilla bean ice cream.


Tuesday, July 1, 2014

Banana Chocolate Chip Bread


I always buy too many bananas.  I eventually forget that I even have them and they just sit on the counter screaming "Please use me!"

Days later my girl's finally see them and start screaming for bananas.  I pull them out of the bag the grocer packaged them up in and TADA!...they have black polka dots, are extremely squishy, and I have to somehow think of a way to destract the kids with some other type of snack.

This bribing doesn't work for them.  They don't forget anything and they aren't going to just let me get away with this. I tell the husband to occupy them for a little bit and I make something they will agree with.


Banana Chocolate Chip Bread!!!
Ding! Ding! Ding!
We have a winner ladies and gentlemen!!

The bread wasn't even out of the oven yet before everyone started shouting and jumping up and down in anticipation.  I had to fight my husband off quite a few times just so I could take a picture!  My own piece of bread?....HAHAHA yea right! Mom's don't get anything "food related" to their own.  Especially when it is filled with bananas and warm melted chocolate chips!


They keep calling it cake.  Which I can't totally disagree with.  It was pretty delicious and super moist!  They have had 3 pieces this morning and are currently jumping up on the table telling me.... "Mommy! More cake!!"

I don't know what excuse I am going to use when it's all gone! HELP! 


Banana Chocolate Chip Bread:
Takes about 1 hr 30 min
Makes 1 bread pan 


You will need:
3 old very ripe bananas
1 tsp lemon juice

2 c all purpose flour
1 tsp baking soda
1 tsp baking powder
1 1/2 tsp cinnamon
1/2 tsp salt

8 tbsp softened butter
2 eggs, beaten
3/4 c brown sugar
1/2 c sugar
1 c chocolate chips

1 1/2 tsp vanilla
1/2 c sour cream


Preheat oven to 325 F
Grease and flour bread pan.

In a medium bowl mash he bananas until they are creamy.  Stir in lemon juice and set to the side.

In a seperate medium bowl whisk together the flour, baking soda, baking powder, cinnamon, and salt.

In a large bowl cream the butter with the eggs, brown sugar, and granulated sugar.
Fold in bananas.
Add vanilla and sour cream.
Mix well.
Fold in chocolate chips.

Add dry ingredients and fold very gently.

Bake 1 hour and 10 minutes or until you can stick a toothpick in the center an it comes out clean.


Thursday, June 5, 2014

Brown Sugar Baked Beans


Do not let the sloppy look of these baked beans scare you away.  They are absolutely AMAZING! I think my husband could eat them all day everyday if I would let him.


My husband and I moved into our new home in January.  We are so grateful for the new season and beautiful weather because we can finally enjoy our new yard!  We have a ton of rooms for guests which means I want to have plenty of cookouts!  The other day started with my sister in law coming to visit.  I made pulled pork barbeque sandwiches, homemade coleslaw, fruit, butterfinger cake, and these delicious baked beans!  It was a hit!


If you are attending or having any cookouts this season you need to make this recipe.  I promise you will have people asking for the recipe!


You will need:
 
1 pound good lean hamburger
 
1/2 green pepper, minced
 
1 onion, minced
 
1 cup brown sugar
 
2 capfuls apple cider vinegar
 
1 1/2 c ketchup
 
6-8 small cans of plain pork and beans
 
 
1)  Rinse and drain the pork and beans.  Put into a large bowl.
 
2)  Cook the hamburger until done.  Drain and put into the bowl with the beans.
 
3)  Add the peppers and onions.
 
4)  In one of the empty pork and bean cans pack 1 cup of brown sugar.  Add the apple cider vinegar and stir until the brown sugar is liquid.
 
5)  Fill the rest of the can with ketchup and stir until well mixed.
 
6)  Pour the sauce in the bowl with the bean mixture and stir very well.
 
7)  Pour the ingredients into a 8x13 dish.  Cover the top with brown sugar and bake in the oven on 350 for one hour.
 
 
* You can also top with pieces of fried bacon.  If so, cover the dish with aluminum foil while baking*


Sunday, June 1, 2014

Butterfinger Poke Cake


Summertime is my favorite season of all!  Other than the heat....and having to wear bathing suits, it always makes me so happy.  There is just so much to do when it is warm and beautiful outside. 
We have been going to the pool with friends, fishing in our pond, meeting friends at the lake, and don't even get me started on the cookouts people have.


When it comes to cookouts I always want to make an AMAZING JAW DROPPING dish. I mean, I want people to know I can cook! I love it when others ask me for recipes, especially friends and family.  It makes me feel all gooey inside knowing others love my cooking :) So feel free to drop some lovely comments on by ;)


I am making dinner for my family tonight and I wanted something easy but delicious for desert.  I have been craving peanut butter and chocolate and thought back to this Butterfinger Poke Cake.  It has been probably 2 years since I have made it.  I sent my sweet husband to the grocery store and got busy as soon as I had time last night.

I usually make this cake with yellow cake mix, but I was craving chocolate and thought I would try it.  I tried to look up recipes on Pinterest to help me remember how to make mine since it had been so long.  However, I had no luck with the links downloading so I winged it.


Angie from Big Bears Wife was over when I putting this cake together.  It looked and smelled so good we had to taste test.  Ooops! Didn't even wait for it to cool!  Is it bad that we tore up the cake before I even had the guests over to try it?  Oh well.... it was worth it!  My husband even ate it which tells me it must have been AMAZINGLY JAW DROPPING !!  YES!  Score for me! I guess for dinner tonight I'll go ahead and place them on plates so no one knows our little secret ;)


Angie urged to me to post this to share with the world....so here it is :)
I hope you all enjoy it as much as we did! 


Butterfinger Poke Cake

1 box of devils food cake mix or yellow
1 can sweetened condensed milk
1 jar caramel sauce
4 full sized Butterfinger candy bars
1 big container of cool whip
chocolate syrup


1)  Mix cake mix as bake as said on the back of the box in 8 by 13 glass dish.  It will bake about 30 minutes on 350.

2)  Let cool and poke several holes in the cake.  I use a straw but you can also use a fork.

3)  In a medium sized bowl mix the sweetened condensed milk with about 3/4 of the jar of caramel sauce.

4) Pour over the cake and let sit for about 5-10 minutes to let the cake absorb the sauce.

5) Spoon the cool whip evenly over the cake.

6)  Crush the Butterfinger bars and spread over the cool whip.

7) Drip the leftover caramel and a bit of chocolate syrup over the layer of Butterfingers.

Make sure to keep refrigerated while the cake isn't being served.

Tuesday, April 22, 2014

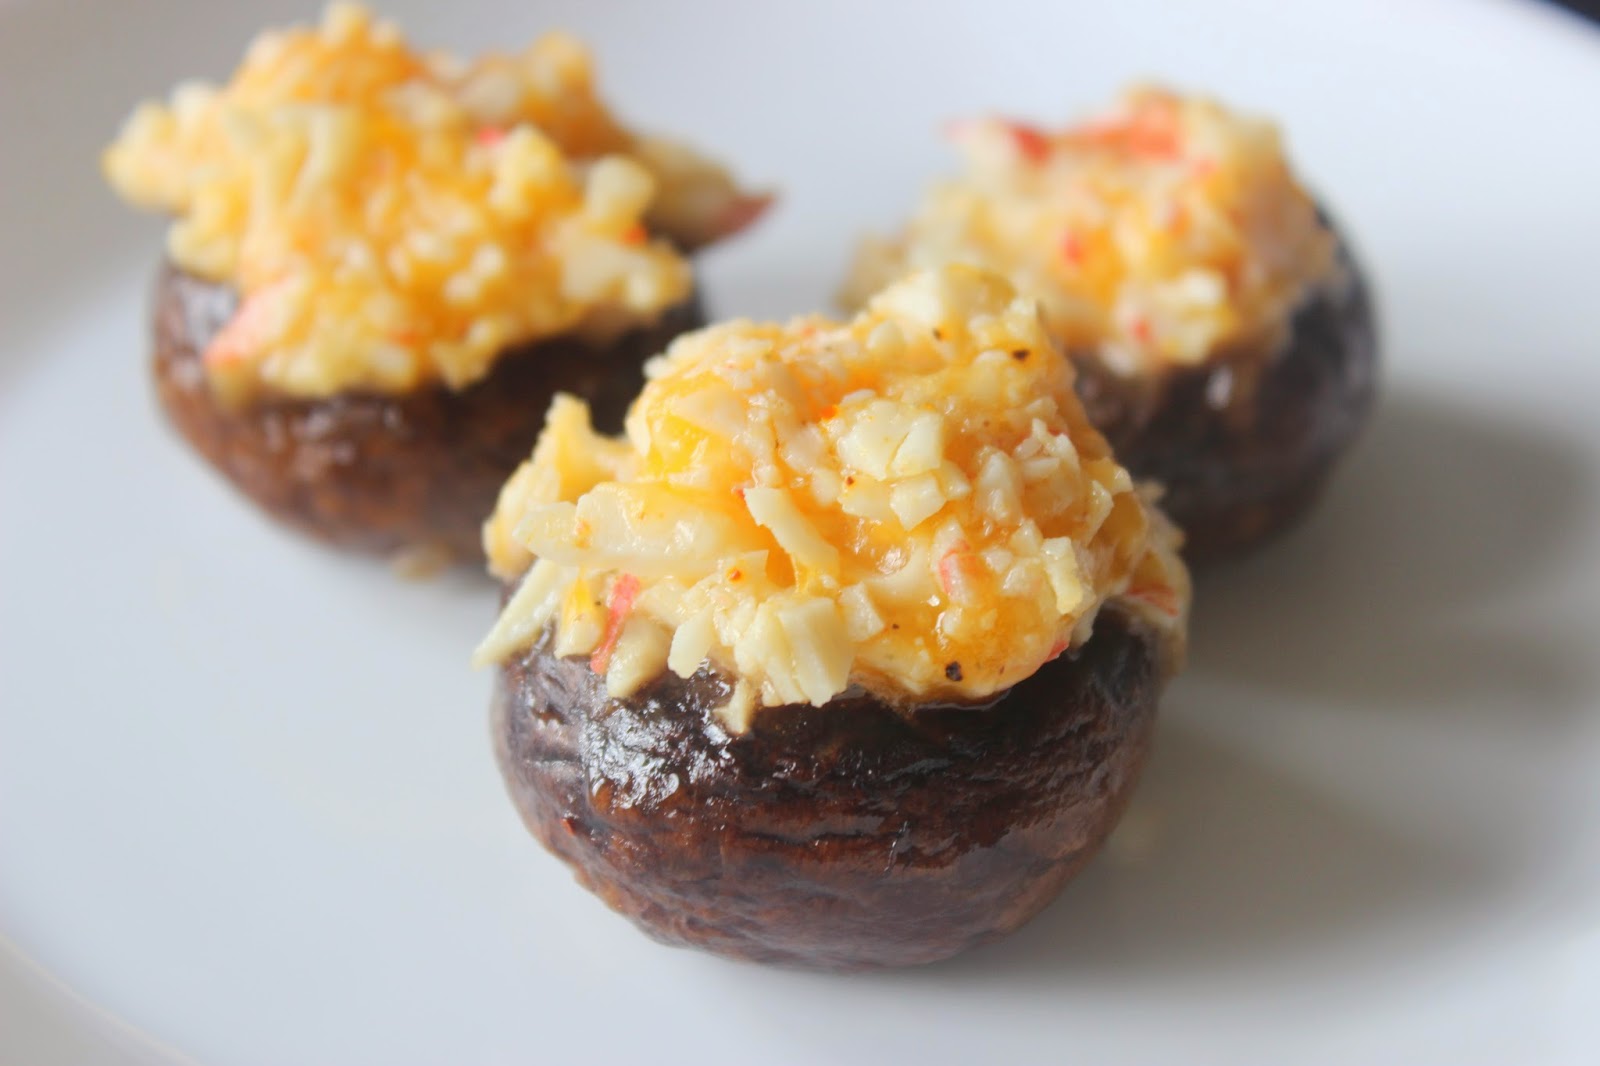
Crab Stuffed Mushrooms


Seafood.  People either love it or hate it.  I admit, I am not much of a seafood lover at all.  Crab stuffed mushrooms however, I could eat them all day long! 


Mmmm.  Doesn't that look good!? Juicy, cheesy, flavorful.  These bite sized mushrooms contain so much flavor that it's almost impossible to eat just one.  Thinking about them, I may just have to go eat some more out of my fridge haha.


My dad's girlfriend made them for dinner one evening and he came home bragging about them.  I am pretty sure that is what sealed the relationship (other than her great personality of course! )


I had her make them for my husband and I one night and got the recipe! YAY! Now I make them quite often, and can share them with all of you!....You're Welcome :)


Here is the recipe!!!
 
2 packs Baby Bella Mushrooms
1 1/2 sticks butter
1 tsp garlic salt
1 1/2 tsp seasoning (Butt Rub brand or Seasoning Salt)
1 1/2 c Fiesta Cheese
1 package crab meat (or imitation)


1)  Grease a glass casserole dish. Preheat oven to 350.

2)  Wash mushrooms and take out the stems.  Mushrooms should look like little bowls.

3)  Melt  butter and brush on top and around mushrooms.  Leave small puddles of butter in 
     the centers of the mushrooms.  You should have butter left over. Let marinate for a few minutes.

4)  Chop the crab meat into fine pieces.  Put in a medium bowl with any leftover melted
     butter, garlic salt, and seasoning.  Top with cheese and microwave about 2 minutes stirring
     occasionally until the cheese begins to melt.  Stir.

5)  Take a spoon and spoon the mixture into each mushroom.  Place the mushrooms with the crab
      side up onto the glass dish.

6)  Top with more melted butter or a pinch of cheese and bake for 30 minutes.


Friday, April 18, 2014

Garlic Butter Parmesan Noodles


I was pretty hesitant to share this recipe for the fact that it is TOO easy.  However, some people need easy.... like myself for example.

I remember being little and my mom would make these for a fast lunch or snack. The garlic smell would fill the house, and I loved it!  Some people don't like the smell of garlic, but it makes me hungry :)


Do you have a comfort food?  Everyone has a completely different comfort food.  Mine is always mashed potatoes or noodles.  These noodles are perfect because they aren't plain.  They actually have great flavor and are just light enough on the stomach.


Did I mention you only need 4 ingredients to make them!? 


Garlic Butter Parmesan Noodles

1 box elbow noodles
1 1/2 sticks unsalted butter
6 cloves garlic
2 cups grated parmesan cheese


1)  In a large pot, boil noodles according to box.

2) In a small saucepan melt butter.  Mince the garlic cloves and stir into the saucepan.  Let simmer
    about 2 minutes while constantly stirring.

3)  Drain noodles and put them into a large bowl.  Pour the butter/garlic sauce over the noodles and
     stir.

4)  Let he noodles cool for a few minutes and then add the parmesan cheese.  You can add as much or
     as little as you would like.

5)  Stir well and enjoy.


Tuesday, April 15, 2014

Gluten Free Dairy Free Apple Cake with Honey Glaze


Apple Cake is one of my favorite desserts! The first time I had it was Christmas Eve and I was only 9 years old!  Unfortunately, it took until now for me to find a recipe to try it again.  Yes, it has been 15 years since I have had it; and guess what? ... It is still my favorite!! 


This Apple Cake tastes just like a cinnamon roll.  Better yet.... one of those cinnamon raisin biscuits from Hardee's. It can be eaten for dessert.... or breakfast ;) and I always pretend it's healthy for me because of the apples.  I can pretend right?


Recently my husband and I have built a new home together.  With a new home there comes a lot of new visitors and entertaining.  Visitors and entertaining is fine by me because I love an excuse to cook!  However, my husbands family has started a gluten free-dairy free diet.  When knowing they are coming for dinner I admit I panic a little.  Thinking of gluten free-dairy free recipes may not seem difficult, but at the moment everything we can think of includes some type of noodle or cheese.  I settle with the easy baked chicken and vegetables.  But what about dessert?  I'm known as the dessert queen so it has to be a killer gluten free dessert!  I automatically wanted to try my apple cake.  Except for a tiny bit of butter, this cake has been made completely gluten and dairy free, and it is just as scrumptious as before!


I have made this cake 5 times in the last two months!  I'm guessing it's everyone else's favorite now too :) Once for me, once from my husband's request, once for my mother in law, once for my sister in law, and another by request for my sister in law's housewarming party! 


If you make this Apple Cake, please feel free to come back and leave me a comment telling me what you think!  If you have any suggestions please feel free to share! 


For this cake you will need:

Glaze: 
2 cup powdered sugar
4 tbsp. honey
4 tbsp. soy milk

Cake:
3 peeled and diced granny apples
1 cup chopped toasted walnuts (or 1/4 cup Earth's Balance and 1 cup regular chopped walnuts)
2 tsp. vanilla extract
2 tsp. cinnamon
3 cup gluten free all purpose flour
1 tsp. baking soda
1 tsp. salt
2 cup sugar
1 1/4 cup vegetable oil
3 eggs

You will need 3 large bowls, a small bowl, a mixer, and a bundt pan.

Directions:

1-  Heat oven to 350 and lightly grease bundt pan

2- In a small bowl melt walnuts and 1/2 a stick of unsalted butter in the microwave for about 2  
    minutes.  Stir every 30 seconds.

3- In a large bowl mix the diced apples, walnuts, cinnamon, and vanilla.  Set aside.

4- In a separate large bowl mix the flour, baking soda, and salt.  Set this aside as well.

5-  In another large bowl beat the sugar, oil, and eggs for about 2-3 minutes. Add the flour mix and
     beat until well combined.  Fold in the apple mixture.

6-  Scrape batter into the bundt pan and bake in the over for 1 hour 30 min or until done. 

7-  Allow to cool for about an hour before dumping the cake onto a plate.

8-  When you have turned the cake out, in a small bowl, mix the
     powdered sugar with the soy milk.  Mix really good with a spoon making sure to dissolve all
     sugar clumps.  Add the honey and stir very well.  Drizzle the glaze over the Apple Cake.

9- Enjoy!!!


** If you don't want this to be gluten or dairy free:
     Use regular all purpose flour in place of the gluten free
     Use regular milk in place of the soy milk.
     If using Earth's Balance to toast your walnuts, use 1/2 a stick of unsalted butter.